Berbagi Software

Berbagi software - Software Pendukung untuk membantu pekerjaan menjadi lebih cepat dan Lebih baik

Need For Speed Most Wanted

Game terbaru NFS Most Wanted dengan Grafik yang cool dan permainan cukup menantang bagi penikmat game Baap Mobil silahkan download di sini.

Cara Instalasi ProTools 10 di hackintosh

ProTools Adalah apliaksi Recording terbaik era ini namun sangat lah sulit untuk di pasang di komputer yang menggunakan Hackintos atau Mac OS bajakan.

Download Ebook

downoad berbagai tutorial aplikasi yang telah di sediakan pada ebook di www.songkar13.com

Teknik Jaringan

Berbagi Tips,Trik ,Solusi dan saran mengenai Jaringan Komputer.

Jumat, 19 Mei 2017

Install Odoo 10 di Ubuntu 16.04


Odoo 10 Grow your Business
Odoo 10 adalah sebuah open source alternatif dari SAP ERP, Oracle E-Business Suite, Microsoft Dynamics, Netsuite, Adempiere, Compiere, OFBiz, Openbravo, dan software enterprise resource planning lainnya. Berikut langkah-langkah cara install OpenERP di Ubuntu 14.04.
Catatan: Saat panduan ini dibuat Odoo 10 sudah stabil. Panduan ini telah diupdate pada tanggal 16 Februari 2017.
Terimakasih kepada semua yang memberi saran dan komentar.

Odoo 10 Grow your BusinessOdoo 10 Grow your BusinessOdoo 10 Grow your Business

1. Update server

$ sudo apt update && sudo apt dist-upgrade
Kemudian reboot server
$ sudo reboot

2. Install semua pendukung

Tambahan jika ingin menggunakan lokasi Indonesia configure locale untuk Indonesia, jika tidak bisa langsung ke install aplikasi pendukung
$ sudo locale-gen id_ID.UTF-8
$ sudo dpkg-reconfigure locales
Install aplikasi pendukung
$ sudo apt install python-pip python-dev libevent-dev gcc libxml2-dev node-less python-cups python-dateutil python-decorator python-docutils python-feedparser python-gdata python-geoip python-gevent python-imaging python-jinja2 python-ldap python-libxslt1 python-lxml python-mako python-mock python-openid python-passlib python-psutil python-psycopg2 python-pybabel python-pychart python-pydot python-pyparsing python-pypdf python-reportlab python-requests python-simplejson python-tz python-unicodecsv python-unittest2 python-vatnumber python-vobject python-werkzeug python-xlwt python-yaml
Install wkhtmltopdf untuk keperluan print ke pdf:
$ sudo apt install libfontenc1 libxfont1 xfonts-base xfonts-utils xfonts-75dpi xfonts-encodings
Jika menggunakan versi 64-bit.
$ wget http://download.gna.org/wkhtmltopdf/0.12/0.12.2.1/wkhtmltox-0.12.2.1_linux-trusty-amd64.deb
$ sudo dpkg -i wkhtmltox-0.12.2.1_linux-trusty-amd64.deb
atau jika menggunakan versi 32-bit.
$ wget http://download.gna.org/wkhtmltopdf/0.12/0.12.2.1/wkhtmltox-0.12.2.1_linux-trusty-i386.deb
$ sudo dpkg -i wkhtmltox-0.12.2.1_linux-trusty-i386.deb
kemudian setelah download wkhtmltx
$ sudo cp /usr/local/bin/wkhtmltopdf /usr/bin
$ sudo cp /usr/local/bin/wkhtmltoimage /usr/bin
Estimasi waktu install tergantung kecepatan internet kamu. Sekarang Odoo 10 sudah tercukupi kebutuhan pendukungnya.

3. Buat akun baru untuk user Odoo 10

$ sudo adduser --system --home=/opt/odoo10 --group odoo10

4. Install Postgresql dan buat akun user Odoo 10 untuk Postgresql

$ sudo apt install postgresql
$ sudo su - postgres
$ createuser --createdb --username postgres --no-createrole --no-superuser --pwprompt odoo10
$ exit

5. Ambil Odoo 10 dari sumber repository

$ sudo apt install git
$ sudo su - odoo10 -s /bin/bash
$ git clone https://www.github.com/odoo/odoo --depth 1 --branch 10.0 --single-branch .

Estimasi waktu install tergantung kecepatan internet kamu.

6. Ubah parameter konfigurasi Odoo 10

Setelah proses checkout selesai, kamu perlu membuat sebuah file konfigurasi Odoo 10 dengan,
$ ./odoo-bin --addons-path=addons -s
Kemudian tekan tombol CTRL+C

Perintah di atas akan membuat sebuah file konfigurasi dengan nama file .openerp_serverrc kemudian salin file tersebut ke direktori /etc/
$ exit
$ sudo mv /opt/odoo10/.odoorc /etc/odoo10-server.conf
Kemudian edit file tersebut dengan parameter sesuai dengan kebutuhan.
$ sudo nano /etc/odoo10-server.conf
Untuk contoh parameter yang diganti:
logfile = /var/log/odoo/odoo10-server.log
addons_path = /opt/odoo10/addons
Buat folder baru untuk penyimpan file log
$ sudo mkdir /var/log/odoo
$ sudo chown odoo10:root /var/log/odoo

7. Membuat OpenERP sebagai service

$ sudo cp /opt/odoo10/debian/init /etc/init.d/odoo10
$ sudo nano /etc/init.d/odoo10

Ubah
DAEMON=/usr/bin/odoo.py
CONFIG=/etc/openerp/openerp-server.conf

menjadi
...
DAEMON=/opt/odoo10/odoo-bin
NAME=odoo10
DESC=odoo10
CONFIG=/etc/odoo10-server.conf
LOGFILE=/var/log/odoo/odoo10-server.log
PIDFILE=/var/run/${NAME}.pid
USER=odoo10
...

Simpan file dan keluar. Kemudian ubah hak aksesnya agar bisa di eksekusi,
sudo chmod 755 /etc/init.d/odoo10

8. Menjadikan Odoo 10 sebagai Service

sudo update-rc.d odoo10 defaults
Restart server
sudo reboot

9. Tes Odoo 10 melalui browser

Setelah semua proses selesai, buka Odoo 10 melalui browser, secara default http://alamatip:8069, contoh
http://192.168.1.200:8069
Default Master password : admin (ubah lah segera untuk keamanan)
Jika ada kendala tolong beritahu saya, kamu bisa menghubungi saya melalui kolom komentar di bawah artikel ini.

Jumat, 24 Februari 2017

Download buku belajar Sharepoint 2013


BERIKUT SAYA BAGIKAN EBOOK SHAREPOINT 2013 Bahasa ENGLISH
(Semoga Berguna dan bermanfaat)

5772f1739f24e.jpg Author Nikolas Charlebois-Laprade
Isbn 9781430264729
File size 17.8 MB
Year 2014
Pages 232
Language English
File format PDF
Download Download

 
5773a93a67c85.jpgAuthor Amanda Perran, Jennifer Mason, Laura Rogers, and Shane Perran
Isbn 9781118495896
File size 50 MB
Year 2013
Pages 672
Language English
File format PDF
Download Download


56c9e1715b8d8.jpg Author Colin Spence and Michael Noel
Isbn 9780672337338
File size 60.4 MB
Year 2013
Pages 1008
Language English
File format EPUB, AZW3
Download download

57754e5b8150a.jpg Author Chris Johnson, Donovan Follette, and Steve Fox
Isbn 9781118495841
File size 22 MB
Year 2013
Pages 456
Language English
File format PDF
Download Download

Membuat dan Mekonfigurasi SQL 2014 Always ON Cluster pada Windows 2012 R2 – Recommended way


SQL Always ON Availability groups hanya mirip seperti Exchange Database availability groups.
ini hanya supports untuk SQL Server Enterprise editions.
mari kita lihat bagaimana cara membuat itu–
  • One domain Controller
  • Two SQL Servers
  • One Witness servers
(bahkan seperti jumlah nodes – memiliki sebuah Witness server sehingga dapat dijalankan sebagai – Node dan file share majority)
Step 1 : (jangan dilakukan Pada Kedua node)
Configure two network interfaces
  • Primary.
  • Replication. (database replication)
Agar tidak ada Single point pada kegagalan network interfaces.
jika replication network gagal ,maka itu dapat otomatis failover pada production network.
image
Replication Network – IP configuration
Default gateway dan DNS tidak harus di tentukan.
Catatan : Primary Network dan Replication network tiddak bisa pada same range.
image
Will do the same on both the nodes . Both Replication IP ,should ping each other
Step 2 : (To be done on both the nodes)
Installing Prerequisites
Start – Server manager – Manage – Add Roles and features – Role Based or Feature based installation
Install Failover Clustering and .Net Framework 3.5
image
image

image
Step 3 : (Do on the first node)
Creating Cluster
Start – Search – Failover clustering –
Right click on Failover cluster manager – Create Cluster
image
Add nodes
image
Give a Cluster name
image
Make sure you Uncheck “Add All Eligible Storages to the cluster
image
image
Step 4 :(To be done on Witness server)
Prepare File share
Login to Witness server – Create a Witness folder – Share it with
Give full control to –
Cluster name
Node1
Node2
Administrators
image
Step 4 : (can done from SQL node1)
Add File share witness to the cluster
Configure Cluster Quorum (File share witness)
Right Click on the cluster name – More Actions – Configure Cluster Quorum settings
image
Select Select the Quorum witness
image
Configure File share witness
image
Browse for the Witness server share
image
Click ok
image
Step 5 : (To be done on both the nodes)
Installing SQL Server 2014
Download binaries of SQL Enterprise 2014 Server
Run the setup – New SQL Server stand-alone installation or add features to an existing installation
image
Chosen evaluation just for my test – you can choose product key.
image
Choose SQL Serve feature installation
image
Choose –
  • Database Engine Services
  • Management Tools – Basic
  • Management Tools – Complete
image
You can choose Default Instance or Named instance if the Cluster is going to be shared.
image
MAKE you use a Domain account with Domain admins permission.
For
  • SQL Server Agent
  • SQL Server Database Engine
  • SQL Server Browser
image
Choose Mixed Authentication Mode –
image
Change the Data Directories to a different drive if its production.
Make sure same drive letters are named on both the nodes.
image
Step 6 : (To be done on both the nodes)
Enable Always ON to the SQL Server 2014
Open SQL Server Configuration Manager – SQL Server Services – SQL Server (MSSQL Server)
image
Always ON High Availability
Enable Always ON availability groups
image
Restart the SQL service . For Changes to take effect.
Step 7 : (To be done on SQL node1)
Create Test database and run a full backup on it.
Create a test database
and Right click on the database Tasks – Backup
image
Click ok
image
Step 8: (To be done on SQlnode1)
Create Availability Group
Login to SQL management studio –
right click on Always on High Availability – New availability group wizard
image
Choose Next
image
Enter availability group name
image
Choose the test database
image
  • Add Replica (Add the secondary server)
  • Configure Listeners (Do not forget to add listeners)
NOTE : Am choose readable secondary “NO” -As Skype for business doesn’t support it. so see the purpose of the application and build accordingly.
But SharePoint 2013 supports though.
image
Typically you can put the listener on  5024, or 5025. Enter the IP Address for the Listener Name.
Verify DNS record gets created for the listener name. If DNS doesn’t exist – Create A record.
image
Choose the file share we initially created.
image
image
Now Restarting servers database should failover automatically.
image

Setting up My Sites pada SharePoint 2013

      Salah satu bagian SharePoint 2013 yang mendapat beberapa perbaikan utama adalah My Site, Profil Pengguna dan feed berita. Artikel ini menjelaskan langkah-demi-langkah proses menyiapkan infrastruktur My Site di Farm SharePoint . 

Prasyarat untuk menyiapkan My Site adalah memiliki User profiles Imports atau sync yang sudah bekerja.

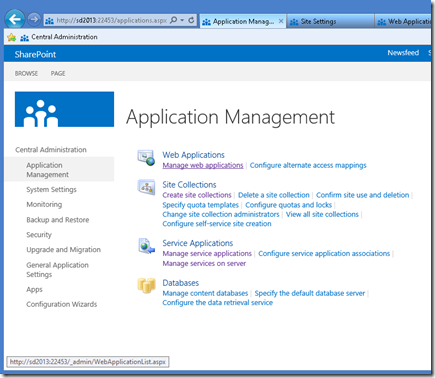
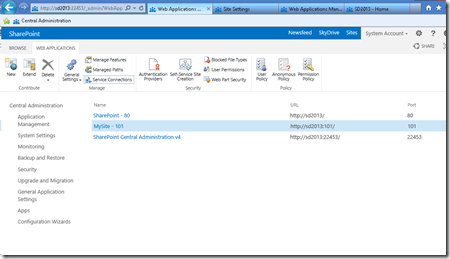
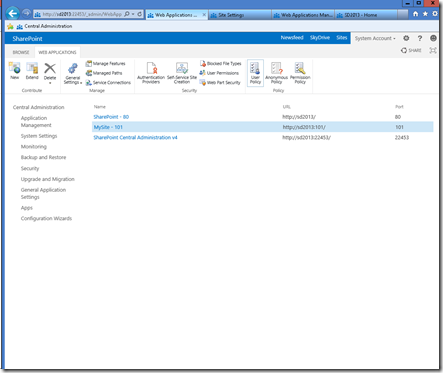
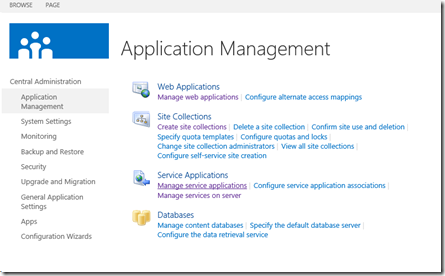
Langkah pertama kita untuk membuat (best practice) web Applications sendiri untuk hosting My Site. Pergi ke Center Administrator ,Application manajement, "menage web Applications"

01

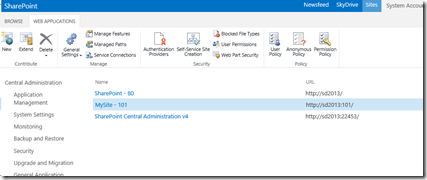
dan buat sebuah web application (contoh aplikasi "sd2013:101" adalah web aplikasi yang telah saya buat).

02

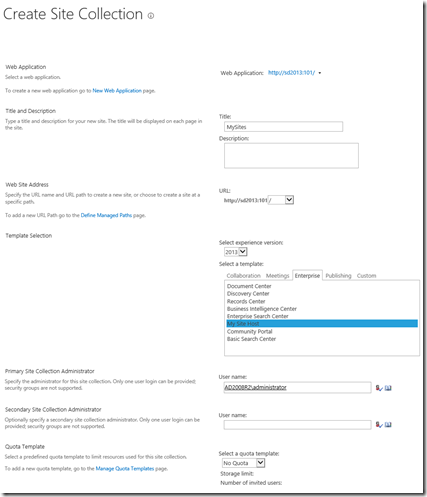
Tahap selajutnya menuju create site collection pada web aplikasi yang baru anda buat barusan. tentu saja kita dapat membuat didalam beberapa jalur web aplikasi yang telah kita buat sebelumnya selain pada root web aplikasi baru, tapi disini saya akan mencontohkan dengan menggunakan root web aplikasi awal yang baru di buat.

Site Collection harus menggunakan  experience “2013”  dan menggunakan Template “My Site Host".

03

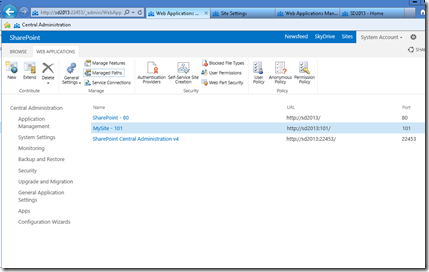
Sebelum menekan Create Site Collection , click pada  “Managed Paths”  didalam  web application untuk menentukan pengelola site induk pada site Collection ini. setelah website induk kita sesuai kemudian tentukan user yang akan memanage mysite ini, lalu pilih Create , tunggu hingga selesai.

04

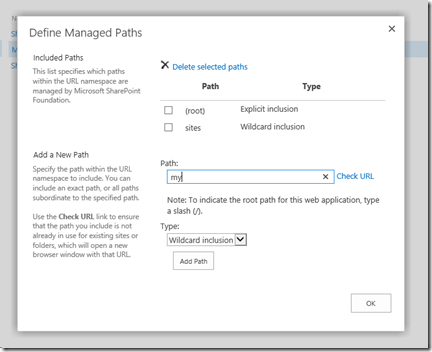
lalu tahap selanjutnya Tambahkan jalur pengelolaan baru dengan memasukan wildcard.  disini saya menggunakan "my" sebagai path mysite .

05

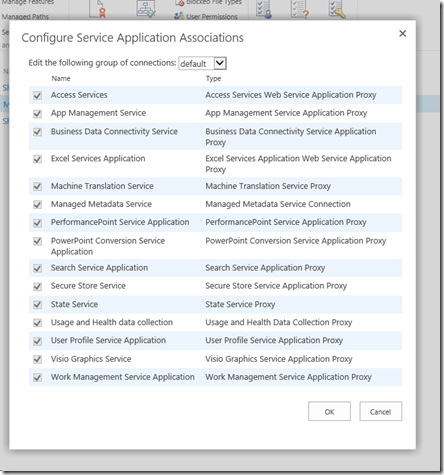
Selanjutnya memeriksa Connection pada Web Application yang akan menjadi Rumah atau Home (Host) untuk my site saya, Click “Service Connections” button untuk melihat set up Service Applications

06

jika anda memilih "Custom" (bukan "Default") di Edit the following group connections:,
pilih aplikasi layanan yang kita ingin hubungkan dengan aplikasi web.   yang paling penting pastikan pilih User Profile service application, the managed metadata service application, dan Search service application.

di contoh ini saya akan menggunakan settingan default
 
07

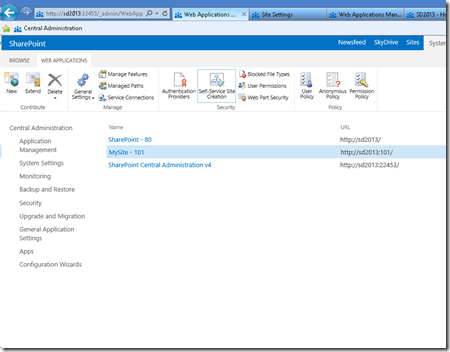
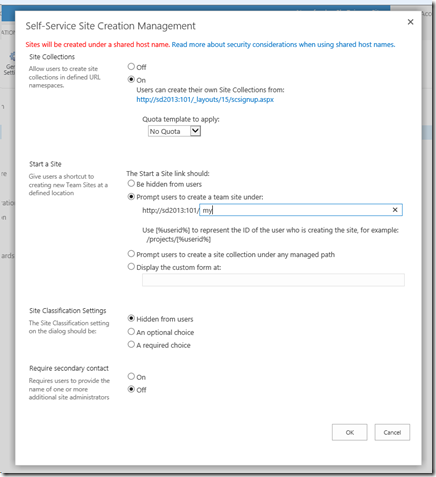
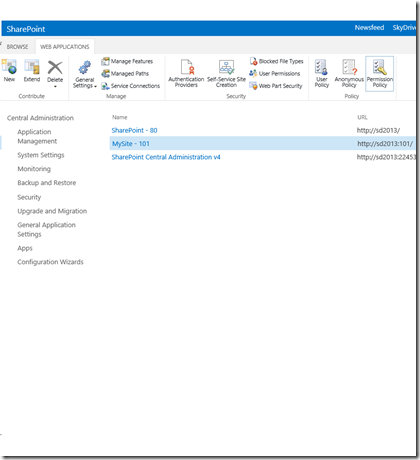
sekarang mari kita lakukan set up pada self service site creation. kembali ke Web application management, pilih web application yang akan kita buat untuk host My Sites, dan click pada the “Self Service Site Creation” button.


08

Click “On” pada “Site Collections” radio box, dan masukan path yang akan kita manage di dalam “Start a Site” bagian (dengan user yang kita pilih “Prompt users to create a team site under” )


09

sekarang lanjutkan pada grant users permission untuk create new site collections (for my sites). Click pada tombol  “Permission Policy” didalam Web Application management, dengan web application yang menjadi hosts the my sites selected.
10

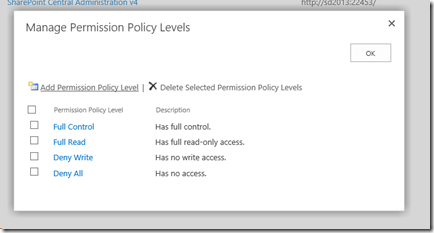
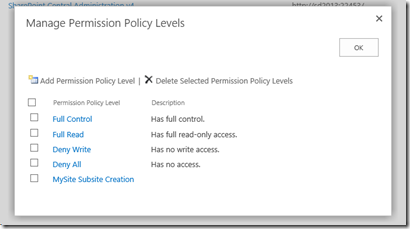
di dalam ”Manage Permission Policy Levels”, click pada“Add Permission Policy Level”

11

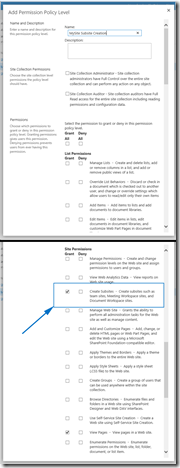
pilih apa yang user dapat lakukan didalam (“MySite Subsite Creation” in my case), dan grant untuk permission “Create Subsites” .

12

Sekarang, permission policy level yang baru akan muncul pada tingkat kebijakan lainya…


13

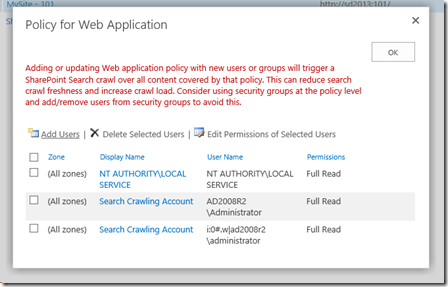
dan kita harus membuat grant that policy level untuk users. Click pada tombol “Users Policy” didalam Web Application management, dengan web applications itu kita buatkan untuk host My Sites terpilih


14

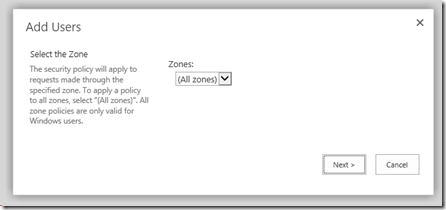
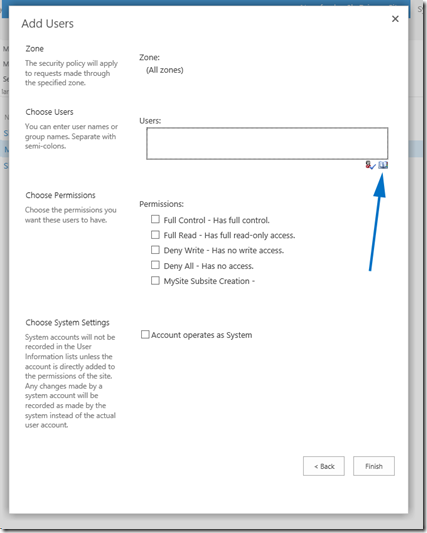
Click on the “Add users” link…

15

From all zones…

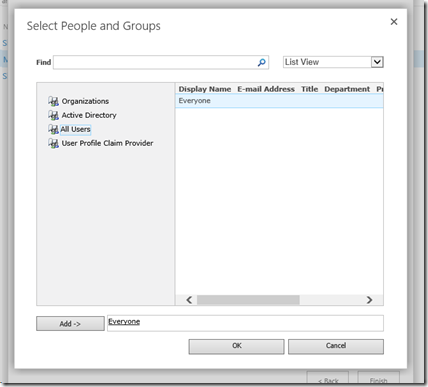
16

dan pilh  users yang dapat mengunjungi mysite ini . pilihan saya adalah “Everyone”.

17
18

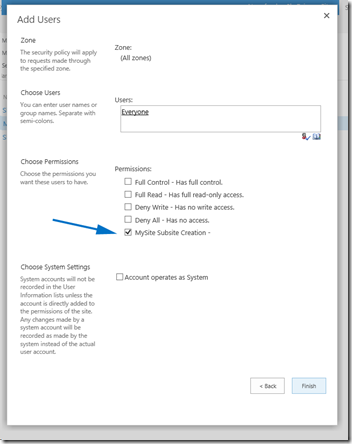
pilih  policy level yang telah kita buat sebelumnya…

19

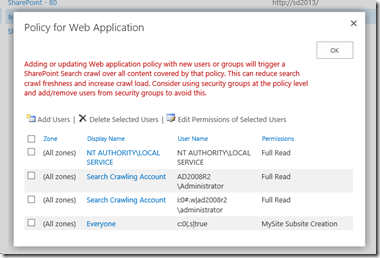
dan sekarang kita dapat melihat “Everyone” dengan  policy yang kita pilih.

20

OK, semuanya tealah selesai di set up dan disiapkan untuk bekerja. Now, finally, let’s set up the my sites. Go to the Central Administration –> Application Management, dan pilih “Manage service applications”.

21

lalu pilih “User Profile Service Application”

22

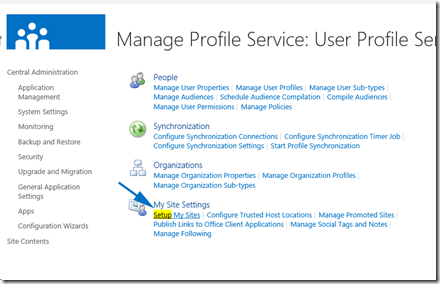
didalam  “User Profile Service Application”, click on “Setup My Sites”

23

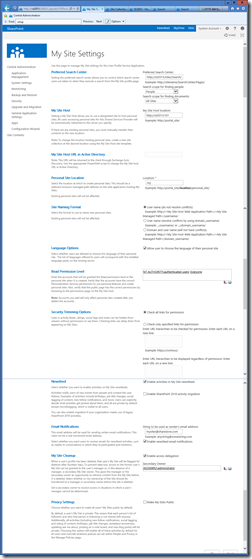
disini kamu harus mengeset search center, my host location (in my case – root site collection of the Web Application that serves as the host) dan personal site location (managed path yang akan menjadi host web application – “my” in my case).

24

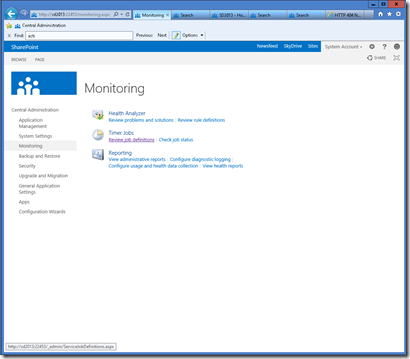
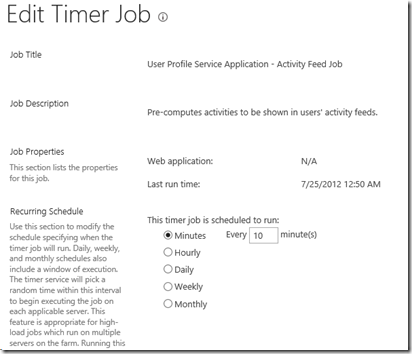
user ini untuk mengatur atifity Feed . Go to the Central Administration –> Monitoring –>Timer Job –> Review job definitions

25

Find the “User Profile Service Application – Activity Feed Job”, and set up the activity feed sync timer according to your needs.


26


timer

And, that’s it.
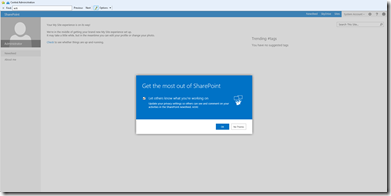
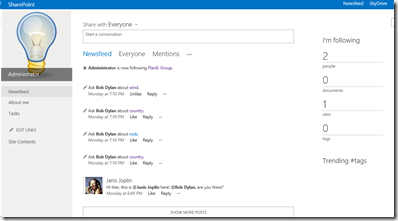
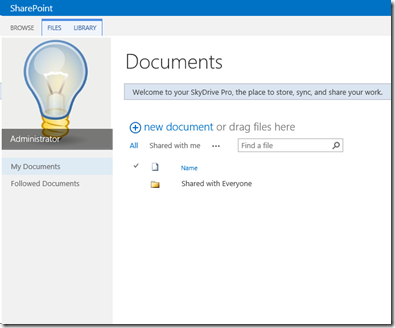
Go to the my site now, and you will be notified of my site creation for your self. Take care of your profile, follow people. Upload you private documents, share documents, follow documents – enjoy being social!


Smile

27


28


29